Self-Hosting on Homelab with Cloudflare Tunnel behind CGNAT
This is the first topic that I would like to discuss here on iSmooth Star because it will put a lot of people down when they find out that they are behind a Carrier Grade NAT (CGNAT) and they cannot publicly self-host any application or service on their Homelab.
Fortunately, there are some ways around it so that you can bypass that CGNAT without even needing to portforward anything or expose your network devices to the internet. Thus, today we are going to explain how to do so using the most convenient method which is Cloudflare Tunnel.
My Short Story of CGNAT
I live in a small country called Bahrain where every ISP there is putting their users behind CGNAT, although there are some companies that would offer you a Public Static IP and then charge you a lot extra, there would still be an issue that remains with the original equipment used to provide you with the internet service, it’s not even suitable for self-hosting and port forwarding.
I remember once an ISP called STC in my country that used to assign your internet service with a public static IP for free if you call their customer service and ask them nicely. So, I decided to ditch my old provider and register with them. Ironically, I faced the issue where the router that they gave me was not able to port forward or be put in bridge mode.
So, what was the point of static IP, I thought that their next step would be selling me another router that is capable. But, I worked around it by reflashing their limited and customized software on the router with the original Huawei software which enabled for me the ability to put it as a modem under bridge mode.
From there, I was able to use a mini PC running pfSense to function as a capable router with dual ethernet NICs for LAN connected to a switch and WAN connected to the bridged ISP modem. Only then I started successfully port forwarding and publicly self-hosting services and web applications on my network with everyone on the internet.
After a year, I suddenly found myself assigned with a private IP again which means CGNAT. I immediately called the customer service just to find out that they no longer provide the static IP as a service addon for individuals but reserved only for businesses.
Therefore, I had to find a way and work around CGNAT that’s when I came across the various tunneling solutions that would put your services online without the need for port forwarding. Definitely, they work great until you deal with their disadvantages, limitations or cost.
I finally settled on Cloudflare as my tunneling service of choice because it’s free, advanced and simple to use. Today, I am publicly self-hosting Odoo, Vaultwarden, URL Shortener and much more behind CGNAT thus I can access them from anywhere especially on the go with my smartphone.
Why I Chose Cloudflare Tunnel
To answer this, I would like to talk about the advantages of Cloudflare Tunnel over a reverse proxy functioning on a traditional web server that’s port forwarded normally without CGNAT.
Cloudflare Tunnel Advantages
- It will bypass CGNAT limitations of your ISP service and it will indirectly expose your services and applications to the internet.
- It can work side by side with your local reverse proxy like nginx for example combining features together to serve services on ports 80/443 and assigning them to your domains.
- It comes integrated with DDoS protection and Bot detection techniques for your self-hosted services.
- You will be assigned with a free SSL certificate for your main domain and all the subdomains created.
- It has a cloud-based chaching system that will substantially reduce the traffic load on your homelab servers.
- You are no longer required to port forward your router at all meaning it will reduce the security risks significantly.
- It’s so simple to use with a user interface and requires no maintenance to function as you would expect.
Reverse Proxy Disadvantages
- You will not be able to share your services outside of your network if you are behind CGNAT.
- It requires a lot of configuration and knowledge to set up a reverse proxy on your own web server.
- You will need to regularly monitor, update and maintain your reverse proxy setup to function.
- If you cannot maintain the web server properly it will introduce a lot of security risks to your network and it will stop functioning.
- You are required to port forward your services and directly expose your network devices to the internet which means more security issues.
Of course, technically there is nothing such as perfect and Cloudflare Tunnel has drawbacks but it’s something that we can maybe discuss in the comment section. For now, I am not going to write about the limitations in this article because we will find out together and it’s currently the best solution you will have for your homelab.
How to Use Cloudflare Tunnel
Did I convince you to use Cloudflare Tunnel on your homelab. If you are convinced, lets explain how you can implement and use it.
Requirements
- A free Cloudflare account.
- A payment method like a credit card or paypal (you will not be charged but it’s needed).
- A domain name (maybe the only thing you will pay for).
- A device on your network that can host services.
- Any internet service package provided by an ISP.
Register an Account with Cloudflare
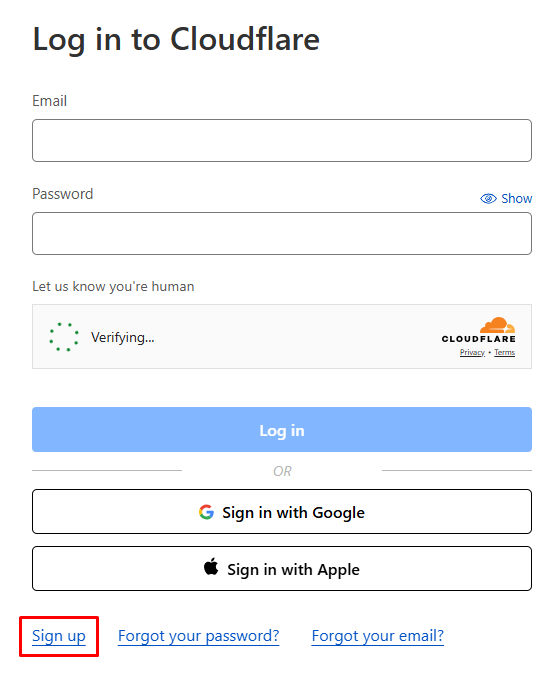
Just go to dash.cloudflare.com and it will ask you to login, if you don’t have an account just click on “Sign up” as shown.
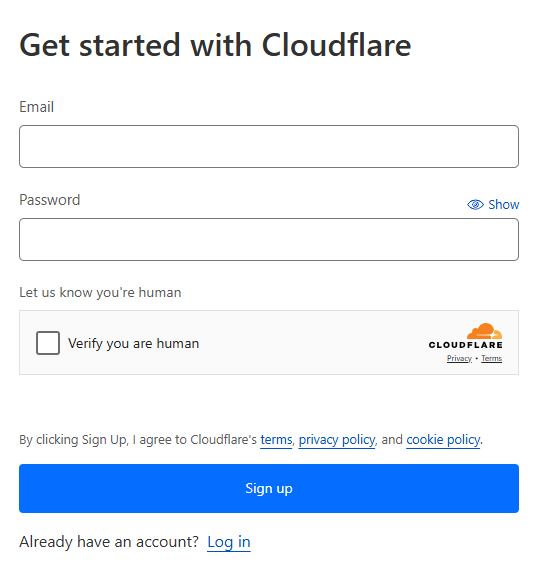
The registeration is very simple you will need to input an email address and a password for your account and click on “Sign up”.
Once registered successfully, you wil be redirected to a welcome screen.
Set up Cloudflare Zero Trust
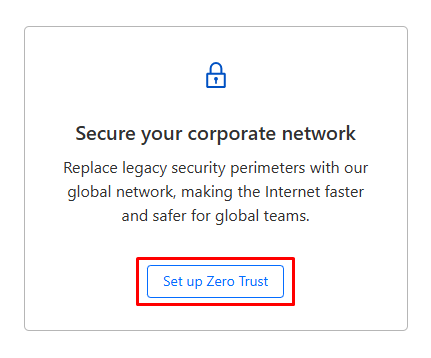
From the welcome screen, proceed by clicking on “Set up Zero Trust” as shown.
Now, click on “Cloudflare Zero Trust” as it asks what do you want to do first.
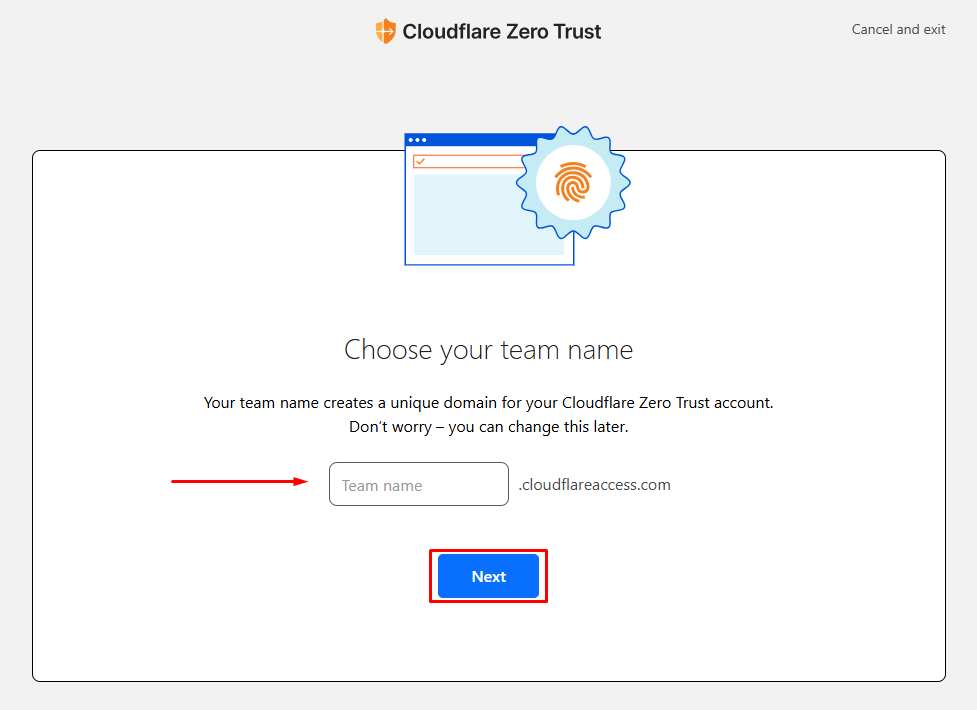
You need to enter a unique name for Cloudflare Zero Trust service then click on “Next”, as they noted you can change this later and it has nothing to do with the domain name that we will use for our homelab.
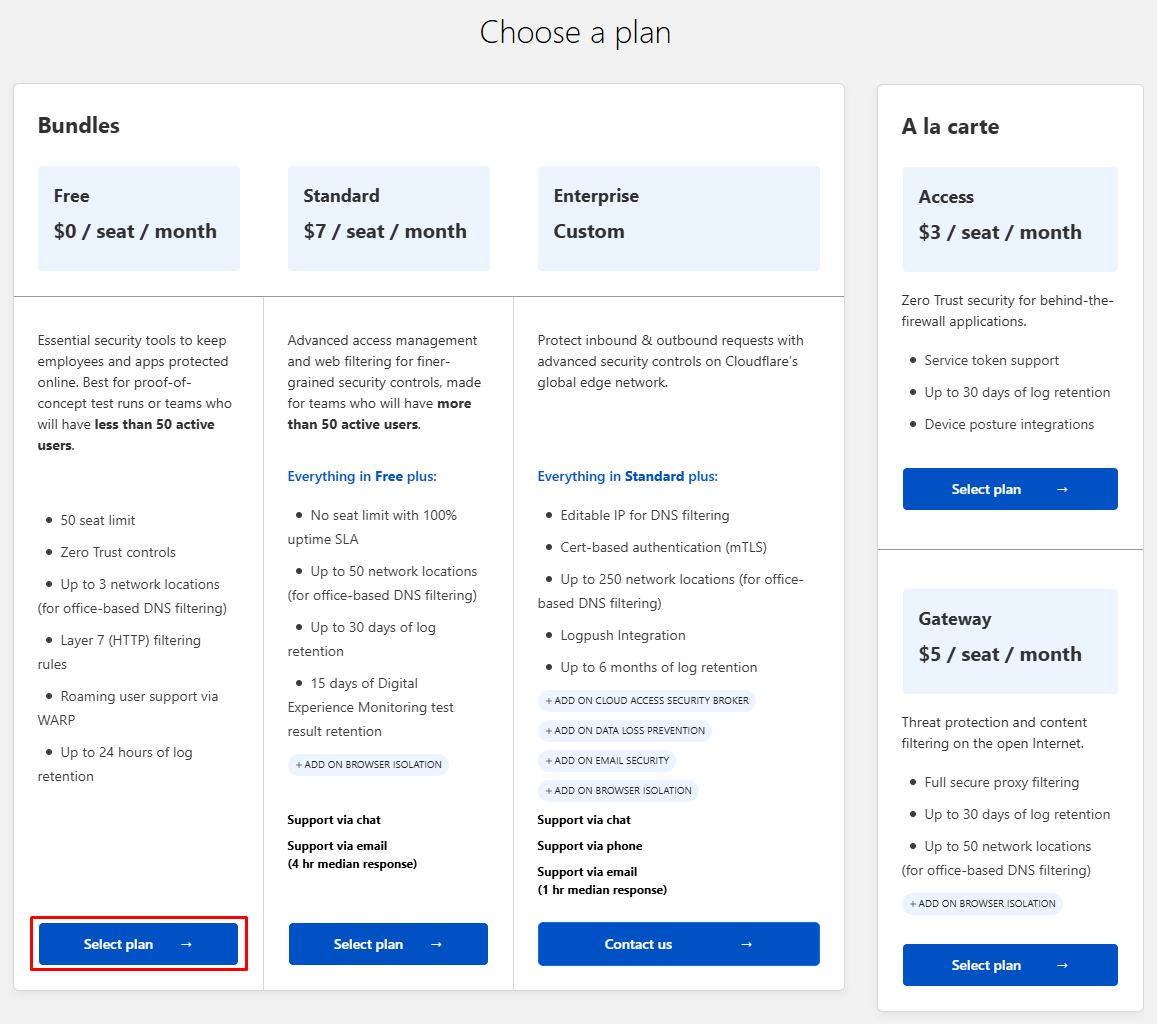
It will ask you to choose a plan for your Zero Trust account, just find the free plan and click on “Select plan”. As you can see there you will find the features and limitations of the free plan although it’s nothing to worry about for homelabers.
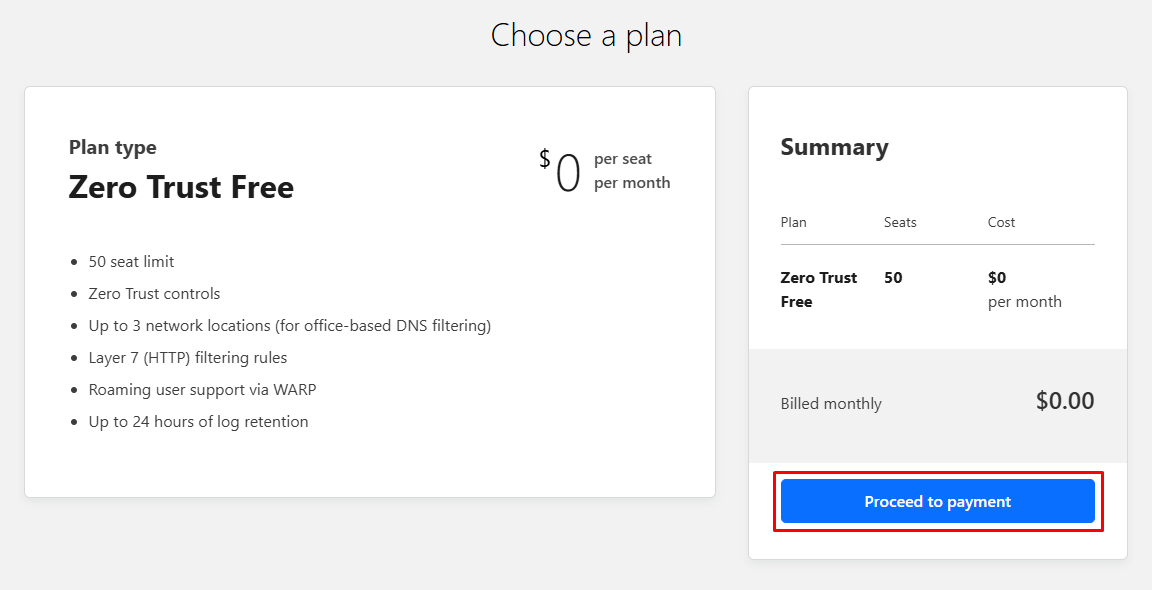
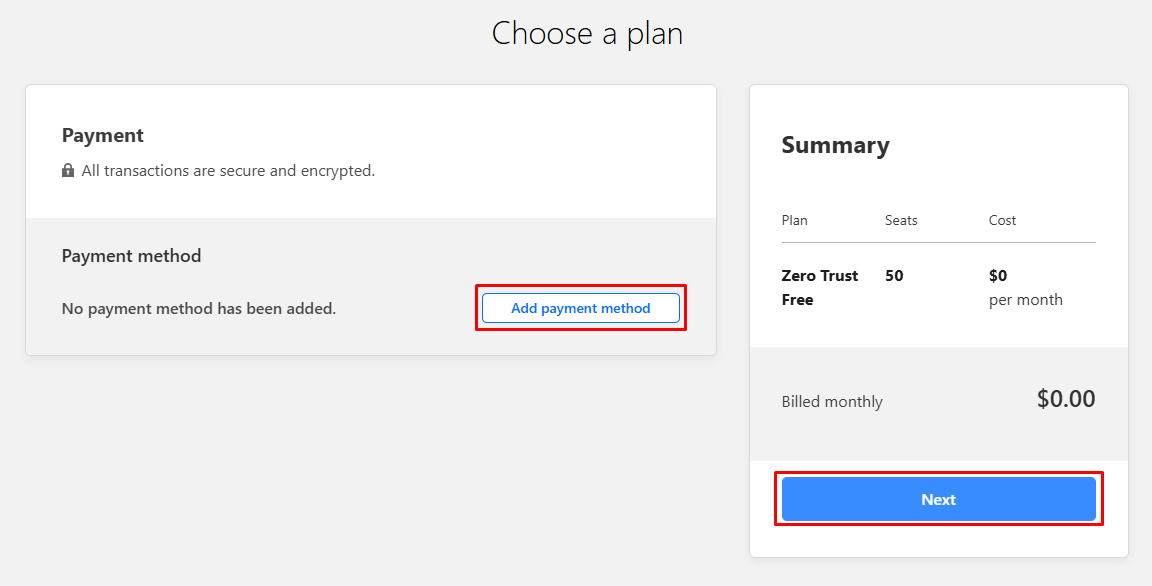
The free plan that you have chosen will still require you to input a payment method so don’t worry you will not be charged, click on “Proceed to payment” and then “Add payment method”.
When you click on “Add payment method” you will be required to enter your credit card details or you can simply just use Paypal, it’s your choice. Fill out your billing address and make sure to click on “Next” once finished and then “Purchase”.
Now you have your Cloudflare Zero Trust service set up with your own details. You need to add your domain to the mix to start creating and using tunnels.
Add Domain to Cloudflare
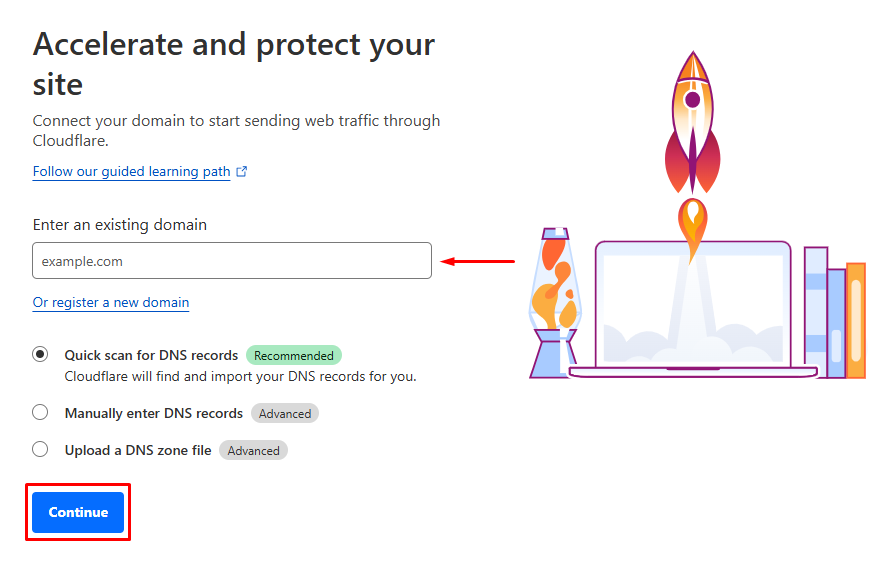
To do this, go back to your main account dashboard on dash.cloudflare.com and make sure you are on the “Account Home” tab from the menu. You will be asked to enter an existing domain name, here you can input the domain that you have purchased, then click on “Continue”.
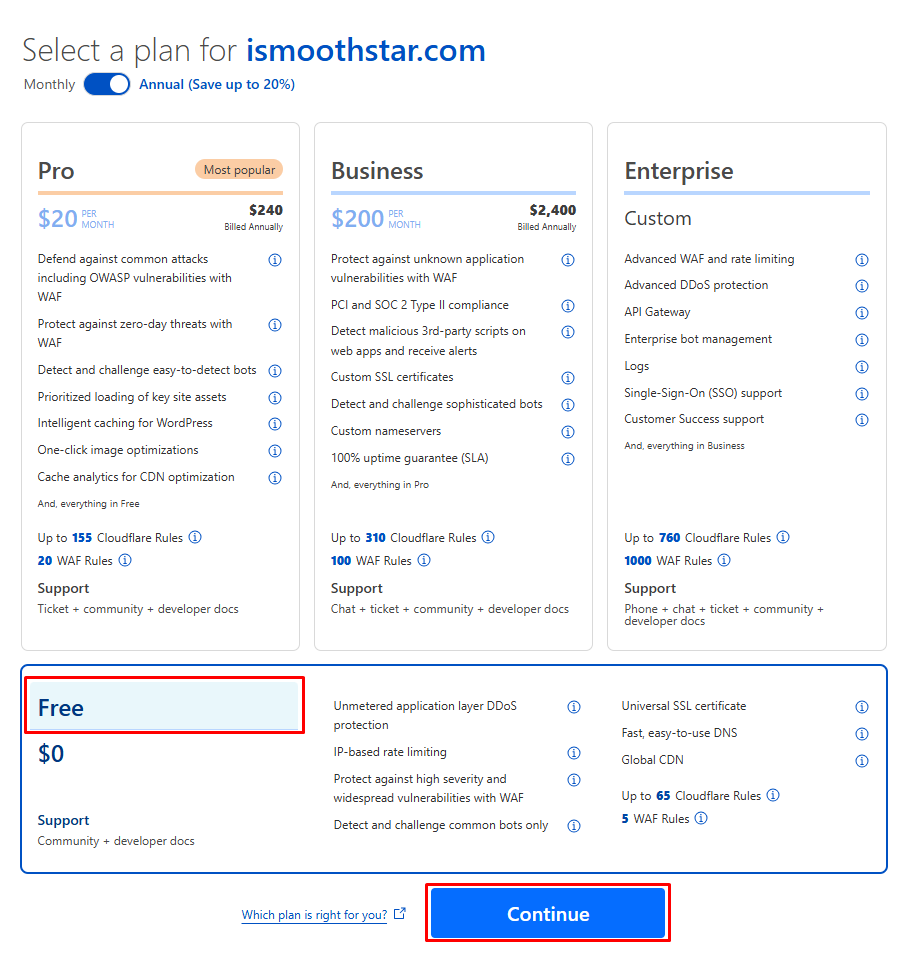
If you don’t have one, you can register a new domain name from Cloudflare themselves. Lets, assume you have already purchased one. Next, you will need to select a plan for your domain click on “Free” followed by “Continue” again as shown.
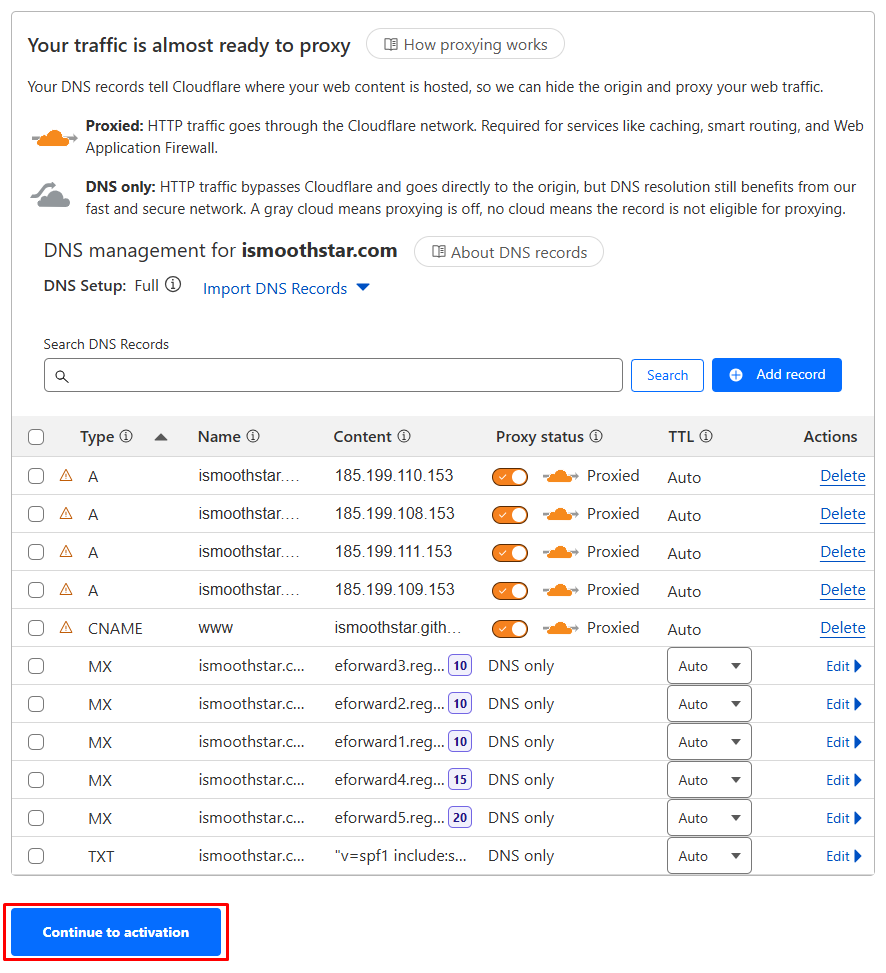
It will add your previous DNS records to Cloudflare DNS servers, review them if you don’t need any of them make sure to delete your old records. Normally, you don’t need any records because we’re assuming that you are using a brand new domain so just click on “Continue to activation”.
Your domain is now added successfully, you will need to update the nameservers of your domain.
Update Domain Nameservers
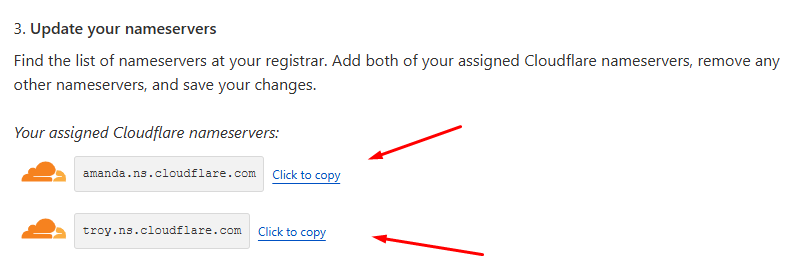
As you can see, it has assigned two Cloudflare nameservers for you to use.
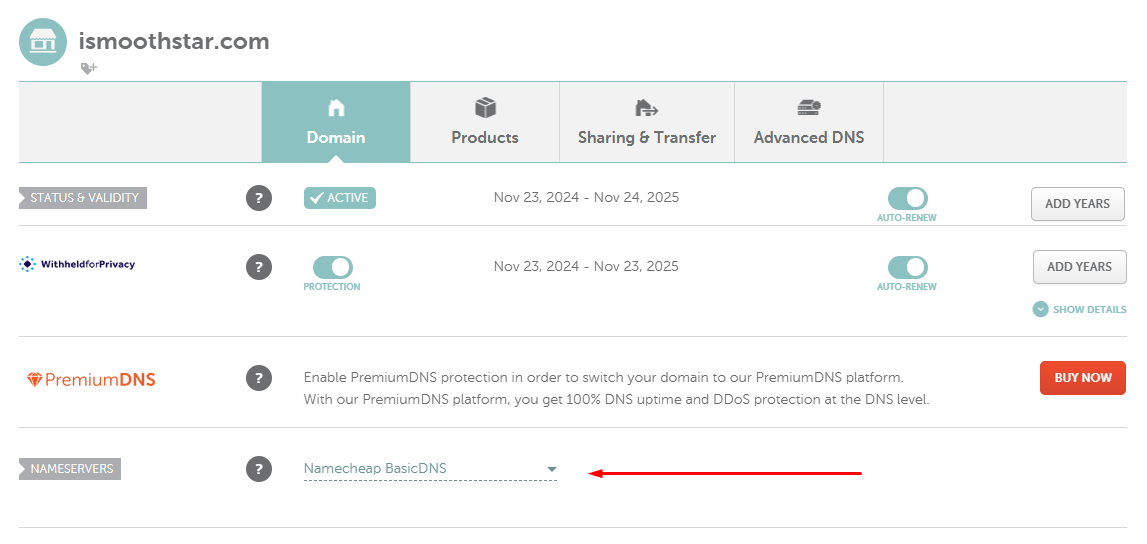
Depending on your domain registrar you will need to follow certain steps to update your domain nameservers. In my case, I used Namecheap to register my domain so I will explain accordingly. Go to namecheap.com and sign in, then from the menu navigate to “Domain List” then locate your targeted domain and click on “Manage” where you will find an option called “NAMESERVERS” as shown.
Select “Custom DNS” from the drop down menu, and enter the two nameservers that were assigned to your domain by Cloudflare previously, then click on that green tick as shown.
You should now have the nameservers of your domain updated. Next, you will need to create a Cloudflare Tunnel where it will be connected to a server on your homelab.
Create a Cloudflare Tunnel
Again, go back to your main Cloudflare dashboard on dash.cloudflare.com and from the menu navigate to the “Zero Trust” tab once you are there go to Networks > Tunnels and click on “Create a tunnel”.
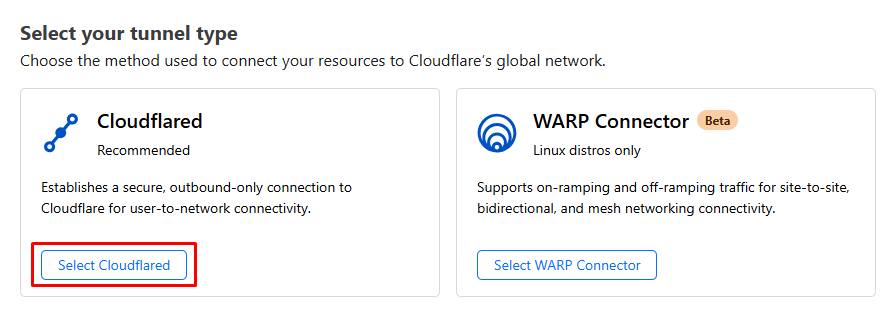
You will then need to select your tunnel type by clicking on “Select Cloudflared” which is the recommended method.
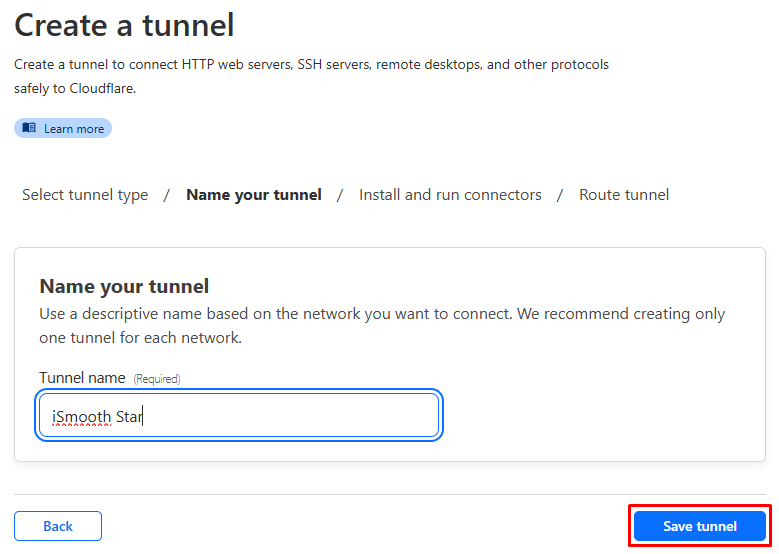
Give a name to your tunnel, you can use whatever you want then click on “Save tunnel”.
Install Cloudflared on a Homelab Server
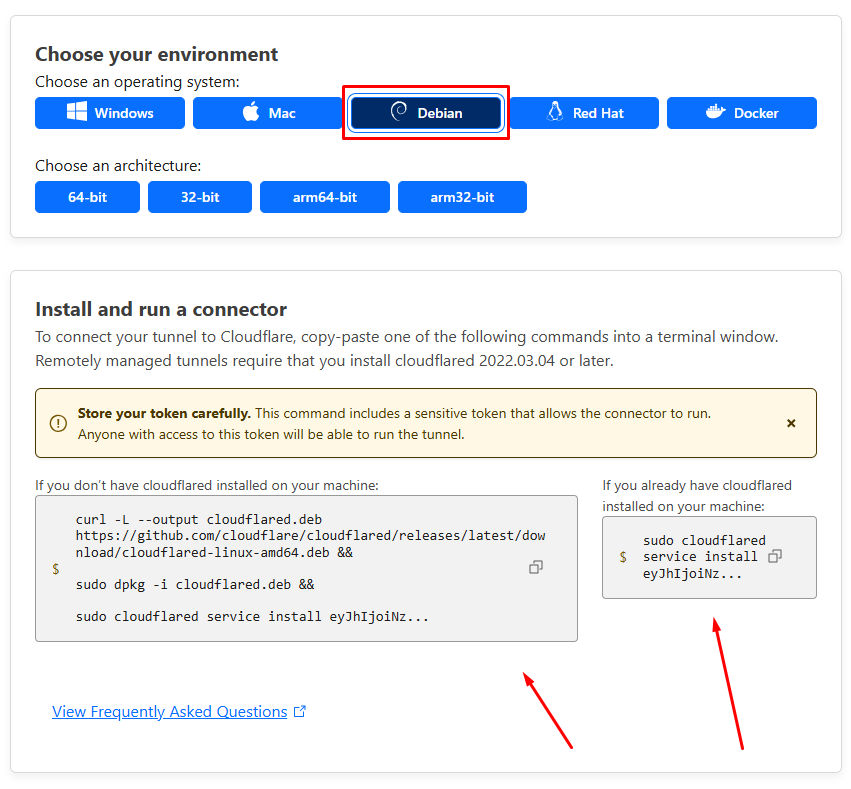
You will need to install an application called Cloudflared to a server on your homelab, it will be responsible for connecting services to your Cloudflare Tunnel. Please select your environment and follow the instructions given to you.
For instance, if you are running Ubuntu 24.04 LTS on the server that’s providing the services on your homelab then you need to choose “Debian” as your environment.
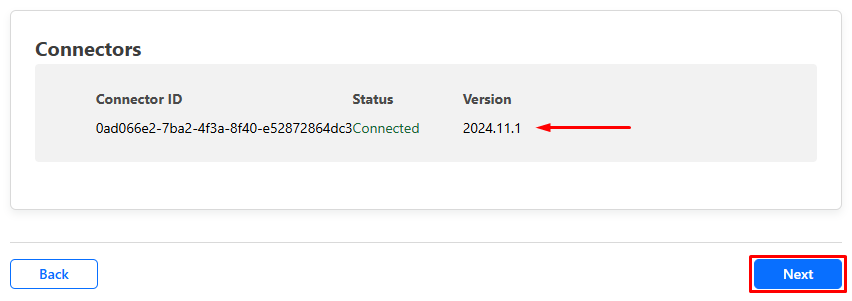
Once you have installed your connector successfully it will automatically show under connectors, you can then proceed to the next step by clicking on “Next”.
Route Tunnel to a Homelab Service
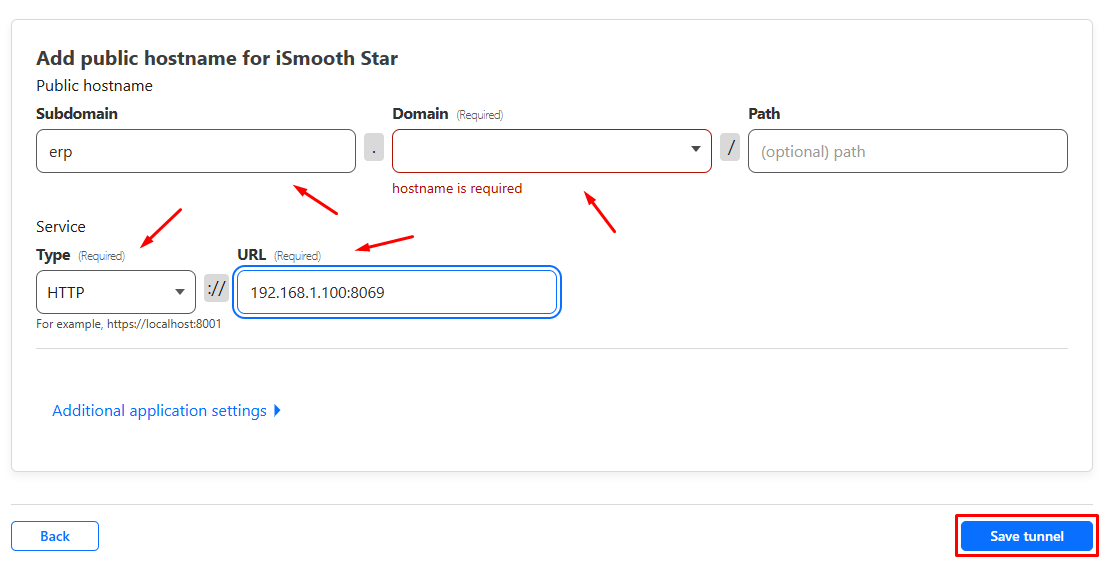
You can now route traffic by adding a public hostname to your tunnel. For instance, in the example below we are assigning a subdomain erp.ismoothstar.com to the server known with the IP address of 192.168.1.100 on our local network that’s hosting an Odoo service running on port 8069, click on “Save tunnel” as shown.
You can route as many services as you want to any other subdomain at anytime, so don’t worry if you have multiple services.
If you want to use the main domain without a subdomain make sure to leave the “Subdomain” field as empty and select your domain name in the “Domain” field.
Add Homelab Services
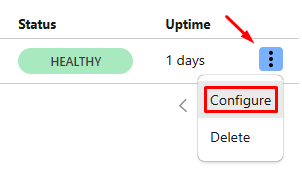
Now that your tunnel is created and routed to a service, you may want to expand it and add more services that are running on your homelab. To do so, from the Zero Trust menu navigate again to Networks > Tunnels then find the tunnel that you have created and click on the colon at the top right to configure it.
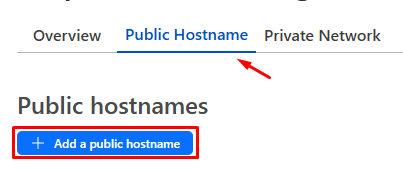
Now, make sure you are on the “Public Hostname” tab then click on “Add a public hostname” as shown.
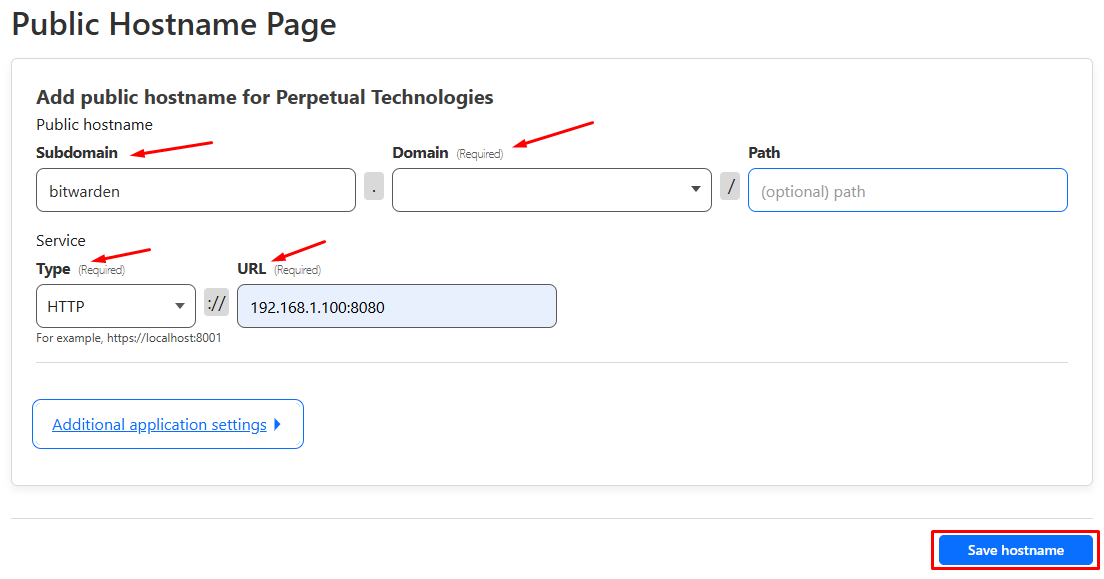
You will be presented again with the same dialog that’s asking you to route the tunnel to another service on your homelab. This time, we will assign the subdomain bitwarden.ismoothstar.com to the same server known with the IP address of 192.168.1.100 on our local network that’s hosting a Vaultwarden service running on port 8080, click on “Save hostname” as shown.
If the service that you are adding is already served through HTTPS with a self-signed SSL certificate you will need to disable TLS verfication from
Additional application settings > TLS > No TLS Verifyturn that option to on.
How to Redirect All Traffic from HTTP to HTTPS
If you want to offer all the services that you are hosting publicly and redirect them to use only HTTPS even when they are originally served using HTTP then you need to enable the “Always Use HTTPS” option.
To do that, go to your main Cloudflare dashboard on dash.cloudflare.com and from the menu navigate to SSL/TLS > Edge Certificates > Always Use HTTPS and switch that option to on.
Conclusion
Altogether, we have learned today that it’s not the end of the world if our homelab is running on a network behind CGNAT just because the ISP decides to make you suffer. In fact, using Cloudflare Tunnel even has advantages over port forwarding a router as you would normally do when you are NOT behind CGNAT.
